Install Windows 7 on a Net-book/Laptop/Desktop with a Pen-drive.
There are very much ways to install windows 7 on a system. Windows can be install by DVD,Network or Flash Drive.Nowadays flash drives are common in use.There are also many ways to install windows by a flash derive also.
Method One.
This is the easiest way to install windows by pen drive( USB Flash Drive).
1) Take a 4 GB Pen Drive (Minimum)
2) Format this drive with FAT 32 file system.
3) Copy the ISO image to pen drive with command line.
xcopy d:\ e:\ /d /e (where d: is the DVD drive which contains windows cd in it and e: is the pen drive location)
It will create a boot-able windows 7 pen-drive.
Method Two.
1) Download/Install Windows 7 USB/DVD Download Tool from Microsoft site.This tool also work with Vista ISO.
2) Run the program.
3) Select the source file from computer and click next.
4) Select USB device. You are given the option to either burn to a DVD or create a USB device.Click USB Device.
5) Choose your USB device. Make sure that your flash drive is connected correctly. You will need at least 4GB space on your flash drive to copy over the Windows installation.
6) The program will format the USB drive to boot correctly, then copy the ISO file onto the drive. The copying process can take up to 15 minutes to complete, depending on the speed of your machine.
Method Three.
1) Plug-in your Flash Drive. First plug-in your USB stick to your USB port and copy all the content to a safe location in your hard drive
2) Run Command Prompt as an administrator. To open a command prompt, go to the Start menu and search for CMD. Right-click on it and select Run as Administrator to use it with admin rights
3) Using the Diskpart utility find the drive number of your flash drive. To do so, type in the following command in the command prompt: DISKPART
4) Running DISKPART will display the version of DISKPART you are running and the name of your PC.
5) Type “list disk” to see a display of all your connected disk drives. Make a note of the number assigned to your Flash drive.
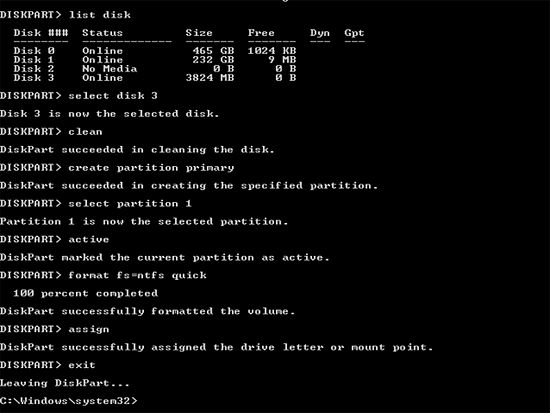
6) Format the drive. Execute the following list of commands one-by-one. Make sure you replace Disk 1 with the proper Disk number from DISKPART.
select disk 1
clean
create partition primary
select partition 1
active
format fs=NTFS QUICK
assign
exit
7) Make the flash drive bootable. Use the bootsect utility that is shipped with Windows7 / Vista . To do so:

8) Insert the Windows 7/Vista DVD and note down the drive letter of the DVD drive. For this guide, the DVD drive is D: and the USB drive is G:.9) Navigate to the directory where bootsect is found.
D:
cd d:\boot
10) Use the bootsect to make the USB Drive bootable. This updated the drive with BOOTMGR compatible code and prepares it to boot Windows 7/Vista.BOOTSECT.EXE/NT60 G:
11) Close the Command Prompt windows.
12) Copy all files from the Windows 7/Vista DVD to the formatted USB stick. The safest and the fastest way would be to use the Windows Explorer. Open the disk, select everything, and drag it into your flash drive. This could take a few minutes to copy.

No comments:
Post a Comment